Remove starter motor
Once the diagnosis of “broken starter” has been made, you need to remove the thing to dissect it on the workbench. Instead of a workbench, you can of course also do this in a campsite awning in a downpour – but bright light and solid ground are simply better. Above all, the unit can then be tested more reliably – to do this, clamp the device firmly in the vice, connect earth to the housing, connect juice to continuous positive (terminal 30) and then bridge to terminal 50.
When the starter works, the pinion jumps out of its rest position, while the whole device simultaneously gives a good jerk and turns. The reason for this is that the motor accelerates at lightning speed without load and thus generates considerable torque. Under load (i.e. real operating conditions), the starter can only be tested in the vehicle.
We are dismantling a 15-year-old Bosch starter with bell housing. Free-cutting devices or starters from Valeo, Marelli, Alanko and the like are sometimes designed differently, but work in exactly the same way.

Replace magnetic switch
The solenoid switch and starter motor are separate assemblies; the switch can be elegantly removed from the actual motor. The construction is screwed together at the front with two or three screws: slotted and Phillips on older models, Torx (e.g. TX 25) on models built after the turn of the millennium. As cast aluminum tends to corrode in contact with simple types of steel, stainless steel screws are often used here – although this does not mean that they can be loosened easily.
True to the motto: “Once the head is ruined, it can be drilled with ease”, the experienced car mechanic forces even the most rotten screws to loosen. Drilling out or hammering the next larger Torx bit into the head has also proven itself thousands of times in practice.
In the end the magnetic switch has lost its original position. At its tip is the tab that is used to move the starter pinion. The piston on which the tip sits can be easily moved (if not, grease it lightly). The complete switch is available as a spare part for some Euros, repair kits with new contact plates, pistons and springs are only available from dealers for very old models.
A look inside the bell housing shows the lever responsible for engaging and disengaging the pinion. The new magnetic switch must be fitted correctly here – a little grease or copper paste won’t do any harm either.


Remove the end shield
If replacing the magnetic switch has not improved the situation, the housing of the starter motor must now be opened. Even though starters come off the production lines of countless manufacturers these days, they are almost always constructed in the same way and are very similar to Bosch’s original starter from the 1940s. Typically, the assemblies of the device are elegantly assembled from several parts and are held together by two or four long screws (“tie rods”).
While the front bearing (with the pinion) absorbs considerable radial forces, the rear bearing is almost meagrely dimensioned and sits in a sheet metal cover that is protected from dust and dirt by a cap.
Unscrew the cap or metal cover. In this case, the two screws of the cover also hold the contact plate with the brushes underneath.
Underneath is the shaft of the rotor, which is secured with a lock washer. Remove this with a screwdriver, as well as the washer underneath and the cork or felt sealing ring.


The starter motor and his brushes
To dismantle the actual motor, unscrew the two black hexagon head screws on the end shield. Fitted with SW7, they hold the electric motor together.
The rear bearing itself is only very rarely itched out. To check, rub the shaft and bearing dry and push them together: You may feel some play here. New bearings are typically included in the repair kit – knock out the old bearing and carefully guide the new sintered bushing into place with a mandrel.


Brushes, carbons, brush holders
To ensure that the electric motor starts in every position, it has many windings and four brushes (or “carbons”) that sit on the brush holder. Dust and abrasion from the brush fire are normal at this point, cleaning does no harm. Next, check the remaining condition of the carbons: Are they still long enough and can they still spring, or are they already hanging in the front stop? If yes or just before – don’t hesitate and replace the brushes.
Nowadays, the small brushes are always firmly soldered to the brush holder and are only replaced as a set and complete with this holder. A repair kit together with the engine’s plain bearings costs around 20 euros and gives the starter new strength.


Letzte Aktualisierung am 2024-04-03 / Affiliate Links / Bilder von der Amazon Product Advertising API
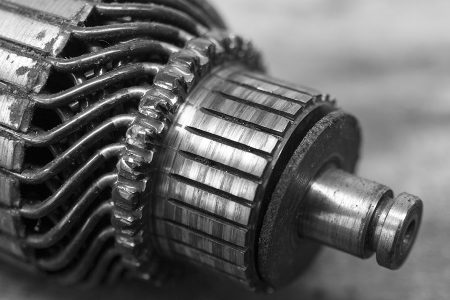
Collector / commutator
The collector collects the current from the brushes and passes it on to the coils on the rotor.
Depending on the mileage and life experience of the starter motor, the thing may show more or less severe battle scars; the dark coloration of the electric copper is completely normal and does not need to be reworked.
Scoring and deep running marks, on the other hand, are ugly: not only do they wear out new brushes much faster, they also cause more brush fire and less engine power. To avoid creating even more brush fire due to imbalance, deep running marks can only be removed on the lathe. To do this, center the rotor cleanly (with less than 5 hundredths of imbalance) and pull it off cleanly with a sharp turning tool. Then mat with 200-grit abrasive cloth.
If you’re not just squatting in a campsite awning, but are stuck in the Hindu Kush, anything goes, of course: Here, a file and sandpaper are used to breathe life into the thing.
This specimen has suffered badly from high currents (starting attempt with blocked engine?) – the copper of individual fins has melted smoothly. This can only be twisted off, but the affected winding more or less fails. Don’t forget to scrape out the gaps, because caked-on brush material also conducts and provokes leakage currents.
If the rotor is completely ruined, you can also buy a new one from Uncle Bosch for 90 thalers.


Planetary gearbox
Once the rotor has been pulled out, the magnets inside the housing become visible. You can also see the planetary gearbox in the lower part, which converts the speed of the electric motor into a high torque to keep the engine running against the compression. Unplug the gearbox, remove old grease and dust and then re-grease.
You should not play soccer on the workshop floor with the planetary gears, as they have small needle bearings that can otherwise be quickly destroyed.
Starters for small gasoline engines often do not have such a gearbox, as the torque is lower and the speed is higher. The sheet steel housing is only held in place by the two long screws, so it is now easy to remove and also exposes the rest of the starter motor, the engagement and disengagement mechanism.


Assembling the starter motor
We had already seen the black lever, or rather its end, after removing the solenoid switch. To the left of the release fork is the pinion (including freewheel bearing), which engages with the flywheel ring gear and ultimately transmits the power to the engine. To the right of this is the planetary gearbox.
Once everything has been cleaned, you can now buy the necessary spare parts from Bosch Service, the parts dealer around the corner or on the internet. The plain bearings in the bell housing, the planetary gearbox and the rear end shield are pressed in, but can also be removed with a slotted screwdriver and hammer if necessary.
When reassembling, lightly grease the shaft on which the pinion runs, as well as the planetary set and the moving parts of the release fork.
Inserting the brush holder still requires a little patience and a few toothpicks to press the new brushes against their springs onto the collector at the same time. Then fit the rear end shield and test whether the starter can be turned easily, otherwise adjust the bearings again a little.
Does the starter run in the vise if you apply continuous plus and then bridge to terminal 50? Great!