Brake stuck?
If the car wants to veer towards the ditch when braking or if one
of the usually four rims is unusually hot after the dream car has been parked, a brake cylinder is usually stuck. Brake discs that are worn on one side are also an indication of stuck calipers that do not allow the brake piston to return correctly. Whether it is a fixed or floating caliper is basically irrelevant.
Cause number one is often simply age: over the years, the rubber of the cuffs and seals becomes porous, allowing water to penetrate. Corrosion is the result, and jamming of the caliper is just a symptom.
Cause number two works faster and is “lack of maintenance”. Because brake fluid has a hygroscopic effect and also draws water through the brake hoses, the brake fluid should be completely replaced every two years. If this is not done, the water that has diffused into the brake system falls out and collects (because it is heavier) at the lowest point – the wheel brake cylinder.

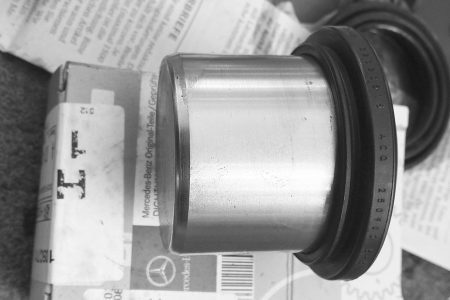
Spare part: Repair kit
Annoyingly, the local parts dealer can quickly charge three-figure sums for a new brake caliper –
so it’s cheaper and better to repair the old part. The necessary spare parts are often sold as a “repair kit”, so a bag with a few rubber parts changes hands for around twenty Euros.
The same applies here: nothing is better than the original! Wear parts from the manufacturer are often cheaper than you might think, and often cheaper than the parts from the accessories – or even worse – the unsuitable and life-threatening parts from the Far East, which are sold on the Internet for “three Euros and fifty”
.

Removing the brake calliper
We show the repair of a Daimler floating frame floating caliper – other designs are generally dismantled and overhauled in the same way. So the car is jacked up and the tire is stripped. The hydraulic dual-circuit brake system, which has been mandatory in Germany since the late 1960s, is now in front of the mechanic.
The brake caliper, which encloses the disc in a stranglehold, is bolted to the steering knuckle on the inside. VAG drivers like to use hexagon socket screws for this purpose, while Daimler swear by hexagons. In practice, however, it is all the same; the screws have to be removed in order to be able to dismantle the caliper.
To do this, it is advisable to deflect the wheel as far as possible.
Before unscrewing the bolts, disconnect the brake wear sensors, otherwise the first (and expensive) casualties will quickly be in the heat of the moment.
Tip: First loosen both bolts, then unscrew the first one completely. Without the “abutment” of this screw, there is no torque support for opening the second one. If you are already thinking one step ahead, you can also loosen the brake hose (next chapter) – this will make it easier to get going.

Loosening the brake hose
Then detach the brake hose from the caliper. Ambitious screwdrivers use a cable wrench that fits , but a normal hexagon wrench is also suitable for repairs on the street, provided that the space available allows it – and the hoses are not too seized up.
The end of the brake hose thread is reached as soon as brake fluid splashes onto the sidewalk – place a cloth underneath beforehand and seal the hose with a rubber plug.
Compressed air to the piston!
The booty is now in front of you: the brake caliper, albeit usually in the form of a rusted cast iron lump. It essentially consists of the (rotten) housing, the bleeder valve, a piston with sealing ring and the porous sleeve that seals the piston to the outside.
In order to be able to replace the sleeve and the piston seal, the piston has to leave its familiar place of years and days. The best way to do this is with the screwdriver’s wonder weapon, compressed air! If you don’t have a compressor, you can use compressed air from a can or a good old bicycle pump with a connection for the rubber boat.
A piece of wood is placed in the caliper opposite the piston to prevent the piston from flying around uncontrollably , and a cloth over the entire calliper protects the ermine sheath from the brake fluid. Now give a short but determined blast of air into the brake line connection: The piston should hit the wooden block with a resounding “Flopp!”.
If you feel like spending a few leisurely hours in the hand surgery department of the nearby university hospital, hold your stylus exactly in the direction of travel of the brake piston and then press the air pressure gun.

Remove rust from pistons
Now the actual work can begin. Pull out the piston by hand and separate it from the sleeve. Sand off the rust on the upper part of the piston with sandpaper and carefully trowel off the grit and sludge on the sealing part of the piston. The piston must later seal in the AXIAL bore – the rectangular ring in the cylinder therefore does not tolerate deep grooves in this direction.
Last round of grinding work on the piston with 1000 grit abrasive cloth. If the rust (in the relevant sealing area) has clearly eaten into the piston, the thing is ready to be thrown away: Nothing can seal here anymore. The enormous pressure would always push the brake oil past the sealing ring and through the rust pits into the open.


Letzte Aktualisierung am 2024-04-03 / Affiliate Links / Bilder von der Amazon Product Advertising API
Fitting the sealing ring
However, if the piston is sparkling clean and immaculate on the workbench, pry the gasket out of the cylinder. Make sure that the surface of the bore is not scratched. If the bore is also corroded, also treat it with abrasive cloth. Pop out the old sealing ring and lubricate the new one with brake fluid and reinsert it. If available, you can also use “brake cylinder paste”. Unlike mineral oil or grease, this stuff is compatible with the silicone-containing brake fluid.
The new sleeve is also initially only fitted to the piston, which is then inserted into the cylinder. As soon as it is back in place, the dust boot can be secured in its groove. Push the piston back completely to make it easier to fit the brake pads.
This assembly of the dust boot is particularly tricky – some brake callipers are so devilishly ugly in design that you may well have to use a few cable ties or blunt screwdrivers to poke or position the boot in its grooves. If in doubt, take a deep breath, pull the piston out again and start all over again.


Guide pins / guide sleeves
If you have the calliper out anyway, it is also worth taking a critical look at the guide bolts and their sleeves, which allow the actual calliper to “float” in the calliper so that the brake pressure is evenly distributed on both sides of the brake rotor. Dirty, rusty bolts or crushed guide sleeves prevent the caliper from resetting smoothly.
The bolts are cylindrical bolts made of slightly better steel, which are screwed into the pliers at the end with a thread. Removing them after 15 or more years requires soft power: they can rarely be removed voluntarily. WD-40, hammer blows and a large pipe wrench ensure strategic superiority on the part of the screwdriver.
As soon as the new bolts are screwed in (to protect them, we recommend using a piece of old jeans in the pliers when screwing them in), they are treated with the enclosed lubricating paste and then disappear into their (also new) rubber sleeves.

Bleeding the brake
Last but not least, the brakes must be bled – air has no place in the brake system. Our brake bleeding overview article shows you how to do this.