
Repair or improve threads
We had this in the previous episode: hard screw meets soft nut thread. This could be a side cover thread in a motorcycle block or the end shield of a coolant pump.
In any case, only the first three threads bear more than 90% of the load, even in light metal. Once again about getting stuck: three threads carry almost all the load of a screw.
If you now pull on that hard screw, all the threads are subjected to shear stress bit by bit and, in case of doubt, give way. If you have not only messed up the start of the thread in this way, but also torn out all the threads professionally, the only conventional remedy is to cut them larger.
However, there is often no material left to screw an M10 into instead of an M8.
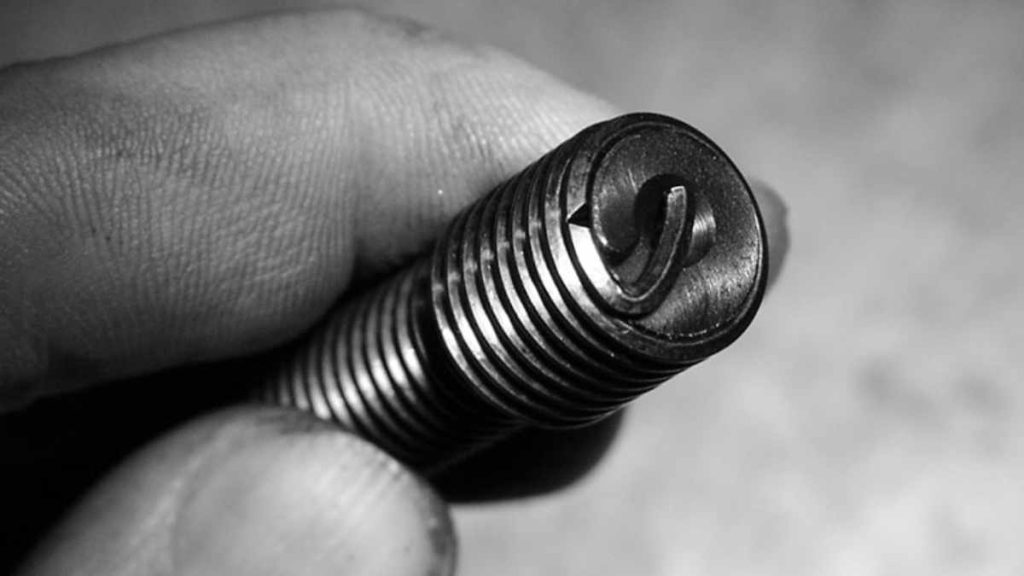
This is where the miracle cure Helicoil comes into play. And the principle of the miracle coil is strikingly simple: a square wire is twisted into the hole and then acts as if it is the external thread. That’s it. This helix-shaped thread wrench is available for almost every thread diameter and in different lengths.
In addition, the wire worms are not only suitable for repairs, but also for prevention. The wire of the miracle helix is made of rock-hard spring steel and therefore offers smooth thread flanks that enable even tightening with torque.
Last but not least, the helix distributes the tensile forces better: for threads with a miracle helix, 90% of the force is applied to five threads instead of three.
So if you want to play it safe with an expensive and particularly beloved light metal part, it is worth armouring the threads with helicoil. Or, as described in the next episode, to equip them with Insert Nuts.


Prepare the hole
The cylinder head of the slaughtered Chrysler remains the same for the coil application. The hole shown here is close to the exhaust duct and is therefore a typical candidate for the wire thread application.
In contrast to the larger tap or the threaded bushing, the coil for the man is only slightly bulky and is therefore the first choice for tricky repairs in the vicinity of oil or coolant ducts.
Nonetheless, the hole must be prepared for the rescue coil: Step one is simply to drill it out. Our broken hole was M8 and should be M8 again. To ensure that there is room for a few grams of helicoil in the hole in addition to the screw, the manufacturer specifies that the hole should be drilled out to exactly 9.62 mm.
And because such a twist drill is of course available everywhere, an additional one is included in the repair kit we used.
This twist drill is used to twist away the worn thread and create a tasty, clean hole.
The original drilling depth is usually sufficient, as the coiled thread holds more than the soft predecessor without reinforcement. In order to guide the insertion tool and be pleasing to the eye, you should countersink the hole.


Cutting special threads
A specially carved tap follows the crooked measure when drilling. This drill should also be included in the wire thread casket and forms the seat for the saving coil. In order to bring the tool shaped by Celtic dwarves in Kaliningrad blast furnaces into position, you need a drop of cutting oil and, above all, a tap wrench.
This is used to turn the thing into the hole. In order to have a perpendicular thread later, you should check the angularity every now and then. Crank back half a turn every two turns to break the chip.


Thread length
The length of the coil depends (roughly speaking) on the tensile strength of the parent material, the available space and the load on the thread.
But because a longer thread can withstand more than a shorter one, the dimensioning of the thread insert is simple – you can always get by with a wireworm the length of the original thread.
And if the thread is quite long, a shorter one will usually do as well: the main load is borne by the first five threads.
Helicoil wireworms are not only available in different lengths, diameters, pitches or materials, they can also be supplied dry, waxed, cadmium-plated or silver-plated.
The specimens shown here are dry, green in color and are called “free running”. This distinguishes them from the red-colored ones that are sold as “screwlock”. This is probably less “screw loose” and more “lock”. Oh well.
In any case, these red screwlock inserts are deliberately demolished at the factory so that the screw is automatically jammed in them.
The green ones are just straightforward and what’s flying around everywhere. Once you have fished the right one out of the box, you still need the right installation tool to insert it into the hole


Screw in thread insert
This insertion tool is a mandrel with screw dimensions and a nose at the end of the thread. This is where the tang of the threaded insert hooks in so that the rescue wire can be screwed in. Turned by hand onto the insertion tool, the wire tightens and stretches a little.
Now, with a little feeling, look for the first thread of the thread and slowly and sensibly countersink the spiral and insertion tool into the hole.
To ensure that the spiral sits properly for the man and does not pinch, turn it one thread deeper. This ensures that nothing hooks behind the new start of the thread and that nobody pulls the expensive precision part out of its bore.
The usual comment from the highly paid employee is then (pronounce slowly) “Huuuuuh? What kind of spiral is that?”, while the horrified onlooker slaps his forehead with the flat of his hand… This pulling out is the usual end of a helicoil repair and also happens if you overload a thread repaired in this way.
Then the external thread of the helix tears out and loosens the wire and screw. In such a case, the only thing that helps is to cut the thread larger or use a Insert Nut.
Once you have reached the bottom of the hole or the correct depth when screwing in, unscrew the screwing tool from the hole in a counterclockwise direction. Almost done!
The coils shown here are called “Helicoil plus” and are the descendants of the coils of the same name without the “plus”. These plusless coils and some of their counterparts had and still have to be applied with a special clamping and screwing tool, preferably the single version.
In principle, the screwing tools and coils from Würth or Recoil look slightly different, but work in exactly the same way.


Snap off the driver tang
Before the old screws are then turned into the new thread with verve and Russian strength, the tang of the helix must be broken off. The manufacturer provides a simple cylindrical pin that is inserted into the hole. A well-measured hammer blow and the thread is finished.
Weeks of testing in the Autoschrauber.de laboratories have not yet been able to conclusively clarify whether a simple screwdriver fulfills the same function.
Just as open and left to personal taste is the whereabouts of the cracked tang in the blind hole. The thing falls silently onto the precious Persian carpet in the through hole.
The next episode will show how the half-dozen Autoschrauber.de Adonises, dressed only in loincloths, clean up the resulting stain with all kinds of contortions. Young ladies, please stay tuned.


Letzte Aktualisierung am 2024-04-03 / Affiliate Links / Bilder von der Amazon Product Advertising API
Expensive rescue
Why should a miracle cure be cheap?
After all, you can do truly magical things with it. What’s more, the competition is rather limited and the benefits are sometimes so great that Böllhoff, as the manufacturer of the original, can charge as much as 300 euros for the handbag shown here.
The war for replicas has been raging for some time – a search for “thread insert” in the omniscient depths of the universe brings all manufacturers and distributors to light. They are not necessarily worse, but they are hardly cheaper either.
Given the high price, it is possible to put together a complete set from individual sets; however, the next broken thread is GUARANTEED to be exactly the same size as the one you have not yet bought. The designer Helicoil handbag therefore simply makes you happy.
